Friday, April 8, 2011

Handy Gadgets

Anyone who knows me can attest to the fact that I love kitchen gadgets. They make life easier and some of them are just plain fun. Here are some of my favorite kitchen gadgets that I currently own.


PASTA MEASURE. I love this thing! It's so handy to measure out 1, 2, 3 or 4 portions of spaghetti, fettuccine, linguine, etc. You could use it for soba noodles or other Asian noodles, too. And it folds back up when you're done.

ROSLE COCKTAIL MUDDLER. I was registering for my wedding at Bed Bath & Beyond, saw this little tool and instantly fell in love. At first sight, it's really fun looking. Upon use in muddling fruits in cocktails? It works really well! Simple to use and efficient.

MELON BALLER. At first glance, you'd think this tool is quite specialized. Well, it kind of is, but I've used it on much more than melons. It works well to pull the seeds and pulps out of squash. It also makes ball shapes out of other fruits like peaches or pears. And we all know how cute those little balls of fruit looking floating in a pitcher of punch or sangria...

CHERRY/OLIVE PITTER. I've not used this for olives yet, but I LOVE this tool for cherries. During cherry season, this thing barely stays in the drawer. It gets those pits out in no time! One note, though: It's best to use this over the sink or trash can, because those pits will fly and the cherry juice can spatter. Usually the inside of my trash can looks like a murder scene after I pit a whole bowl. Yikes!


MESH STRAINER. This is a great tool and I use it all the time. This one is pretty small (3-inch), but it's great for straining out the juice in small cans of olives, chilies, pimientos, etc. I use it most often for straining the pulp/seeds out of citrus juices. It's pretty versatile and comes in bigger sizes.


MICROPLANE GRATER. As a lover of kitchen gadgets, it's hard for me to choose a favorite. But this one might be it. Citrus zest can add such great flavor to baked goods and savory entrees alike. This tool makes grating citrus fruit a snap. I love using it for hard cheeses as well, like Parmesan. And for a grater, it cleans up surprisingly easily.


Thursday, April 7, 2011

The Great Pizza Caper!

I've been pretty excited about capers lately. This all started after I went to visit my brother in Denver. We went to a little Neapolitan pizzeria called Proto's. We ordered their Roman pie, which was made with mozzarella, tomato sauce, kalamata olives, capers and roasted red peppers. I have to admit, I was a little hesitant at first. Capers on pizza? I wasn't so sure about it...

OMG, was I wrong to be hesitant! It was fantastic. Something about the briny, lemony little pop of the capers with the tomato sauce and the olives just worked so well! I've seriously been having dreams about this pizza ever since. So I knew I wanted to recreate it when I got back home.

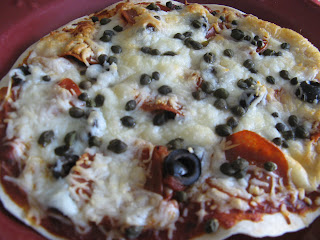
I was on my own for dinner one night and decided to make myself a little Roman pizza recreation. I started with a flour tortilla (I like to use pocketless pita breads for individual pizzas but didn't have any on hand that time) and spread on a bit of homemade pizza sauce. I topped it with turkey pepperoni, sliced black olives, an Italian cheese blend and lastly, capers. Threw it in the convection oven for 10 minutes and it came out delicious!

I'd definitely like to give it another try with kalamata olives and roasted red peppers, like I had at Proto's. As is surely the same with other people, my meals can often depend on what I've got on hand at the time. But what I can tell you for sure is that I will never think twice about capers on pizza again!

Monday, April 4, 2011

Green Thumb

Despite the strong winds, yesterday's weather was beautiful! I decided to take advantage of the sunshine and plant some more herbs. I've already been growing basil, mint and a little bit of oregano. I planted the basil and oregano last spring, from seeds. The basil has been doing quite well but the oregano kind of failed.

I wanted to plant more herbs to use in cooking. I bought some already-started herbs at my local garden center. They are called Bonnie plants and come in biodegradable shells so you can just plop them down in the soil. Very simple! I purchased some more oregano (since the scant amount I have currently isn't nearly enough to use culinarily), rosemary (I tried to start some rosemary from seeds last year but they didn't take), thyme and Italian flat-leaf parsley. I'm really excited to start using my new herbs and it's always fun to watch them grow. I highly suggest growing your own herbs. It's convenient, cost-effective and enjoyable.

Below is a picture of my little herb garden, which is currently by the sliding glass door in our kitchen. I brought them inside for the winter and still have them inside currently because Missouri weather is crazy and I don't want them to die! They seem to be doing quite well by the window, though. (There's also a Greek myrtle and the beginnings of an amaryllis there, neither of which are edible. They just want to join in on the sunlight.)


From left to right: My crazy wild mint and scant oregano, basil, rosemary, Greek myrtle, amaryllis, thyme, flat-leaf parsley and oregano.


A close-up of the basil and rosemary.

Sunday, April 3, 2011

Getting a Taste of Home

In my time as a home cook, I've tried a lot of recipes. As you all know, some turn out to be duds and others turn out to be keepers. One source for recipes that I know I can always count on is Taste of Home. Every Taste of Home recipe I've ever tried has been wonderful. Anytime I'm looking for something new, be it for a supper club night with friends, food day at work, or just a weeknight dinner, Taste of Home is always my go-to source. Today I want to sing the praises of The Taste of Home Cookbook, which is the best cookbook I own. It is fantastic is so many ways. It has information in it that is useful to any home cook. Some of the features that I have found useful are:


  • Guides for storing, preparing and using fruits and vegetables. I have found this very useful when buying new produce, or when I just want a refresher on how to prolong the life of say, raspberries.

  • Easy-to-follow instructive guides. This cookbook helped me make a beautiful lattice-topped pie on my first-ever attempt. Lots of pictures are included too, which is a great tool when you're not really sure if those egg whites have reached stiff peak stage yet.

  • References, glossary and indexes. To name just a few, included here are lists of ingredient substitutions, food equivalents and cuts of meat. Seriously, I can't be the only one who wants to know where on the cow that brisket came from.

Basically, this cookbook has pretty much anything the home cook could ever want to know. So much useful information and fantastic recipes. Below is one of my favorite recipes from the book. I love this recipe because it's quick, easy, healthy and flavorful.


Spaghetti Squash with Sweet Peppers courtesy Taste of Home Cookbook, 2006


1 medium spaghetti squash (2 pounds)


1/2 medium green pepper, sliced


1/2 medium sweet red pepper, sliced


4 medium fresh mushrooms, sliced


1 small onion, chopped


1 tablespoon olive oil


2 medium tomatoes, quartered (or you can use 1 14.5-oz. can of diced tomatoes, undrained)


1 garlic clove, minced


1/2 cup chicken broth


1/4 teaspoon salt


3 tablespoons shredded Parmesan cheese


1) Cut squash in half lengthwise; discard seeds. Place squash cut side down in a microwave-safe dish or plate. Microwave, uncovered, on high for 10-12 minutes or until tender. Cool.


2) In a large nonstick skillet, saute the peppers, mushrooms and onion in oil until tender. Add tomatoes and garlic; saute 4-5 minutes longer. Add the broth and salt; simmer, uncovered, for 3-4 minutes.


3) When squash is cool enough to handle, use a fork to separate strands. Place squash on a serving platter or individual plates; top with the pepper mixture. Sprinkle with Parmesan cheese.


Yield: 4 servings


Nutrition facts: 1/2 equals 110 calories, 5 g fat (1 g saturated fat), 4 mg cholesterol, 372 mg sodium, 13 g carbohydrates, 3 g fiber, 4 g protein.


The pepper mixture in the skillet, before adding to the spaghetti squash.

Thursday, March 17, 2011

Tough Critic

My new try for the day was to make corned beef and cabbage. Not groundbreaking by any means, since it is St. Patrick's Day after all. However, still totally traditional, and new to me! I've never made it before, but I was actually a little scared to! My husband has unreasonably high standards for corned beef (blame the kosher delis), and anytime I make something new, I always ask him several times, "Is it good? Should I have done anything different? Is it good enough that you want it again?" etc. How am I supposed to ask him for an honest opinion about a new endeavor when he has such high standards?! I didn't want to set myself up for disappointment.

Luckily, I discovered that much like beef brisket, corned beef brisket is pretty foolproof. Unless you slice it incorrectly or something (resulting in tough meat), you pretty much can't mess it up. I loosely followed a few different recipes for a slow cooker preparation, and it was insanely easy.

I added the following ingredients to the slow cooker:
  • baby carrots
  • small red potatoes, quartered
  • water (4 cups)
  • beer (I used about 8 oz. of Bud Select because that's what we had on hand)
  • flat cut corned beef brisket (and the included seasoning packet)

I put the first 3 ingredients in the slow cooker first, then placed the brisket on top. I poured the beer over, then rubbed the seasonings over the brisket. I cooked this on high for 8 hours. When I got home from work, I added chopped cabbage, gave it all a stir then set on high for 1 more hour. Then that was it!

One note about briskets. You can get either a point cut or flat cut brisket. The point cut is cheaper (at my market it was $1/pound cheaper), but it's fattier. The flat cut still has a layer of fat on the underside, but that is easily removable after it's cooked. I made the mistake of trimming a brisket once - bad idea! Not only is it difficult to remove while the meat is raw, but you're removing all that great flavor that the fat imparts! So if you're trying to eat healthier, like me, spend the extra $3-4 for the leaner flat cut and just remove the extra fat before you eat it. It's a win-win.

What's great about a dish like this is that you can adjust the ingredient amounts to your liking. Add more carrots, less potatoes, etc. I'll probably add more carrots next time because they had such an awesome flavor (I used two cups this time). We have lots of leftovers!

The meal was fantastic and the corned beef was so tender, juicy and flavorful. The husband gave it a 8 out of 10 (a rating of 10 being his died-and-gone-to-heaven kosher corned beef). For my first attempt, I'll definitely take that! Success. :)

Monday, March 14, 2011

Irish Soda Bread

I woke up this morning to quite the snowstorm! It's not uncommon for St. Louis to see snow in March, but today's accumulation was a bit unexpected. When it snows or ices, it's usually quite difficult for me to make it up the hill in my subdivision. This morning was no different, so I found myself waiting it out. I had a small bit of time before the next try-to-make-it-to-work attempt, so I decided to make a recipe I'd found for Irish Soda Bread. This one is from Better Homes & Gardens and has currants and oranges in it...mmmm. Sounded good to me! With St. Patrick's Day soon approaching and me wanting to try new things, I thought it would be a fun venture.

This recipe was quick, easy and fun. Here's a basic rundown.

First phase: Dry ingredients and orange zest mixed together.

All ingredients, including currants, fully combined:

About to go into the oven. Mental note: Don't stand so close to the open oven door this time... (see post from March 4, 2011)

The finished product! Pretty good looking, if I do say so myself! :)


The orange zest and currants really add a lot to this bread. Soda breads aren't generally super flavorful, but this recipe is quite delightful. I put a warm piece in a bowl with a little bit of milk, which was tasty. Spreading some honey or marmalade over a piece would be very yummy as well!

I have to say, I was not really into baking bread before this. But making this bread today was fun! I really quite enjoyed getting my hands into it, even for just a brief kneading. Kneading the dough made me remember my mom baking bread when I was little, and her teaching me how to knead the dough. This experience has opened my eyes to further baking possibilities, and I can't wait to try more breads!

Thursday, March 10, 2011

Citrus-Basil Cooler

I'm going out for dinner tomorrow night at King and I (which many consider to be the best Thai food in St. Louis), which got me thinking about the Thai basil I grew last summer. Unfortunately, I didn't have much time to play with it before it all burnt up in the August heat. I started thinking about cocktails in which I could use Thai basil, or just plain basil. I've been obsessed with Cara Cara oranges lately, so I thought the two could join forces. (If you haven't tried a cara cara orange yet, you must! They have the perfect balance of sweet and tart. And they have an awesome name!)

I assembled my ingredients:
  • fresh basil leaves
  • juice of 1/2 a cara cara orange
  • vodka
  • sweetened lime juice (which I didn't use during the first run but decided on because the drink was definitely lacking without it)

I bruised the basil leaves with a muddler, then muddled them with the orange juice. I added about a jigger of vodka, 1/2 jigger of sweetened lime juice and shook with ice. Strained into a martini glass and that was that!

This Citrus-Basil Cooler is tart, citrusy and refreshing. I could drink this all year, although it would be perfect for summer. When you take a sip, the aroma of the basil hits your nose. A subtle basil flavor lingers after the citrus is gone. I didn't use exact measurements when I put this together, so you could tweak it to your liking. You could limit the tartness if you want, you could use citron vodka or unflavored, you could throw in more basil, etc.

In terms of mixology, I have so much yet to learn. However, I really enjoy a good cocktail and I know what flavors complement each other, so that's my springboard. Time to go make myself another!